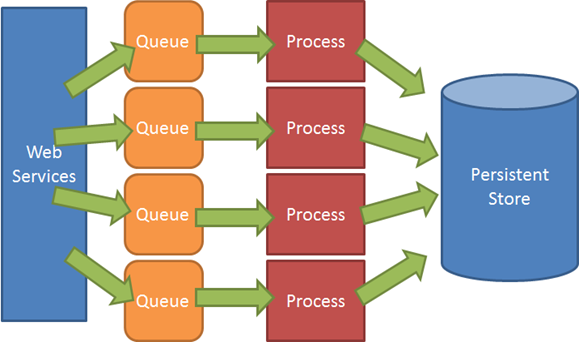
I’m currently working on a project where I need to be able to transfer a large number of requests via JSON over web services. I need to take some of that data, do some aggregation with it, and store it in a persistent store. In order to allow the data to be reliably processed in a number of different ways, I wanted to place the incoming data into multiple queues and have it processed and then stored. Something like this:
At this point you might be wondering why I’m not using MSMQ, since most of the work I do is on Windows. Well, a few different reasons. First and foremost, I am running all of my infrastructure inside of EC2, so I want the option of running the queues on a Linux box. Secondly, because the web service front end is a very thin layer that simply transforms the incoming JSON into message to drop on a queue, I want the option to run those in whatever language I want and be confident that I will have no issues connecting to the queues. Third, I want to be able to persist or not persist messages to disk and have my queues operate entirely in memory or on disk. This is especially useful in EC2 where hard disk performance is somewhat lacking.
RabbitMQ fits the bill on all of these fronts, is crazy easy to setup and use, and is very fast. Enough jabbering, lets move on with the show…. in order to get started, head on over to http://www.erlang.org/download.html and download the latest Erlang runtime. RabbitMQ is written in Erlang, and requires the runtime in order to operate. Next, head over to http://www.rabbitmq.com/server.html and download the latest server release. The current release, as of this writing, is version 2.1.0. Make sure that you grab the Windows release. After downloading, just unzip the folder somewhere on your hard drive.
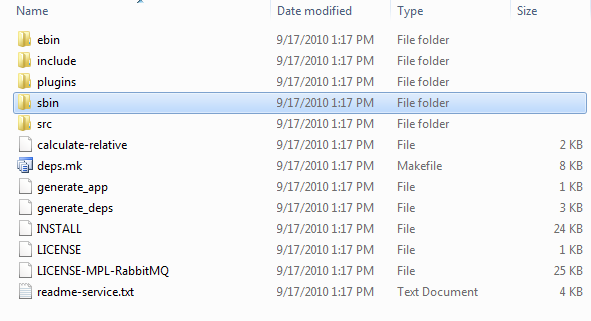
Your folder will look something like this, with the sbin folder being the one that holds the batch files that we are going to use to control RabbitMQ on Windows:

Next you are going to need to set the ERLANG_HOME environment variable in order to run RabbitMQ. It is easy, all you have to do is open up an admin console, and execute this (based on your version of Erlang):
setx ERLANG_HOME “C:\Program Files (x86)\erl5.8.1”
Easy. Now you are ready to run RabbitMQ. The easiest way is to tell it to run as a Windows Service. This way you can be sure that it will stay running even if you restart your box. Again, open up a console and go to your RabbitMQ sbin folder:
![]()
Now just run:
rabbitmq-service /install
Then run:
rabbitmq-service /enable
And finally:
rabbitmq-service /start
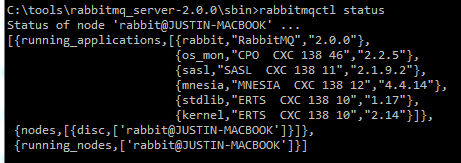
Now you have the RabbitMQ service, installed, set to automatically run, and started. Now it is time to get it setup. The next batch script that we are going to use is rabbitmqctl.bat. This is the batch script that we are going to use to control and get stats on the server. You should be able to run the command:
rabbitmqctl status
and you’ll see something like this (if you get a connection error, go into “C:\Windows\” and copy the “.erlang.cookie” file from there into your user folder “C:\Users\{username}” folder. This is a Erlang cookie that allows processes to interact):

You can now be sure that your RabbitMQ server is up and running, ready to server requests. I mean honestly, it couldn’t be any easier than that!
The first thing you should consider doing, especially if your instance of RabbitMQ is publicly accessible, is to secure it a bit. If you run the command, rabbitmqctl list_users you will see that your server has a single user named “guest”. This is the default user that RabbitMQ creates, and it has full rights to the RabbitMQ instance. You might want to start off by creating a new user with a password and granting that user full rights. We can do this by running these commands:
rabbitmqctl add_user justin greatpass!
rabbitmqctl set_permissions justin “.*” “.*” “.*”
The first command creates a new user with a password. The second tells RabbitMQ to grant the user “justin” configure, write, and read permissions to all queues.
Now you can run:
rabbitmqctl delete_user guest
Now that we have gotten through all of the boring stuff, now we get to connect to it and have some real fun! First, you need to grab the .NET RabbitMQ client, you can get it from here: http://www.rabbitmq.com/dotnet.html I prefer to grab the zip files and unzip it somewhere rather than using the Windows installer.
Once you unzip it, move the RabbitMQ.Client.dll into your programs lib folder. Add a reference to it from your project. Now we are ready to start creating some queues! But first, lets talk a bit about RabbitMQ. RabbitMQ implements AMQP (Advanced Message Queuing Protocol). A basic part of the AMQP is the concept of exchanges and queues. In is a bit of a simplification, but exchanges are the message routers, and queues are where the messages reside. By decoupling the concepts our routing and message storage, it gives you a lot more flexibility in how your messages can be filtered and delivered.
The first thing we need to do in order to use RabbitMQ is to setup an exchange. The exchange is where we are going to send our messages. In order to setup and exchange, we need to first connect to our server. We can connect to the server by using the “RabbitMQ.Client” namespace and setting up a ConnectionFactory class:
var connectionFactory = new ConnectionFactory();
connectionFactory.HostName = "localhost";
connectionFactory.UserName = "justin";
connectionFactory.Password = "greatpass!";

using (IConnection connection =
            connectionFactory.CreateConnection())
{
    using (IModel model = connection.CreateModel())
    {

    }
}
Now that we have a connection factory setup, we can call the ExchangeDeclare method:
model.ExchangeDeclare("MyExchange", ExchangeType.Fanout, true);
The first parameter is the name of our exchange, the second parameter is the exchange type, and the third is to tell the server that our exchange is “durable”, meaning that it will survive a server restart. I’ll explain the exchange type in a second.
Now that we have declared the exchange, now let’s go ahead and declare a queue:
model.QueueDeclare("MyQueue", true);
The first parameter is the queue name, the second is to tell the server to create a queue which will survive a restart. And finally we need to bind the queue to the exchange:
model.QueueBind("MyQueue", "MyExchange", "", false,
        new Dictionary<string,object>());
The first parameter is the queue that we are binding, the second parameter is the exchange that we are binding to. The third parameter is the routing key, which instructs the exchange how to route messages. Since we have a fanout exchange, we don’t need a routing key since a fanout exchange means that all messages sent to the exchange get sent to all bound queues, no keys are needed. If we had created a direct or topic exchange, then we could specify keys in order to cause messages to be routed in different ways.
Now it is finally time to start sending messages to the exchange! Hell yes! Finally! To do this we can call the “BasicPublish” message like this:
string message = "Hello!!";
IBasicProperties basicProperties = model.CreateBasicProperties();
model.BasicPublish("MyExchange", "", false, false,
    basicProperties, Encoding.UTF8.GetBytes(message));
Our message just contains the text “Hello!!”. We create the basic properties for the message by calling a method on the model. Then we call BasicPublish passing the exchange name, and routing key. The next two parameters are for “mandatory” and “immediate”, respectively. If we specify the message as mandatory, then it will get returned through the BasicReturn event handler if there is no queue bound to the exchange, otherwise it is simply discarded. Immediate is a bit more complicated, but basically it means that the message needs to be consumed pretty much immediately or it is returned to the publisher. The next parameter, the “basic properties” are just extended properties that we can set on a message. This allow us to control things like persisting a message to disk. Finally, the last parameter is the contents of the message. Once we run this code, we can go back over to our console and run this:
rabbitmqctl list_queues
Now we can see that our queue exists and a message is sitting in it!

Now that we have put a message in the queue, let’s go ahead and consume that message!
Consuming a message starts off the same as publishing a message, we create our connection factory and model in the exact same way. Then we simply create a subscription and start pulling messages off the queue using the “Next()” method:
using (IConnection connection = connectionFactory.CreateConnection())
{
    using (IModel model = connection.CreateModel())
    {
        var subscription = new Subscription(model, "MyQueue", false);
        while (true)
        {
            BasicDeliverEventArgs basicDeliveryEventArgs =
                subscription.Next();
            string messageContent =
                Encoding.UTF8.GetString(basicDeliveryEventArgs.Body);
            Console.WriteLine(messageContent);
            subscription.Ack(basicDeliveryEventArgs);
        }
    }
}
When we create the subscription we have to tell it the queue name and whether or not we are going to “Ack” the messages. Here we are passing false, which means that we want to ack each message. If we process the message successfully, then we ack the message which means that it will be removed from the queue. If, for some reason something happens, then the message won’t get acked and will left in the queue for further processing. In the meantime, before we ack the message, no other consumers can see the messages.
In the code above, when we call “Next” if there are no message in the queue, then the call blocks until one is available. Whenever a new message drops in the queue, this code will happily go about processing them. I know what you are probably thinking now, how fast is it???
Well, with non-persistent messages, I was getting around 17,000 published messages per second on my dual core i7 laptop. I was getting around 22,000 received messages per second. When I switched to persistent messages (meaning that they are written to disk), I still get around 13,000 published messages per second and about 12,000 received messages per second. Fairly impressive performance, but these numbers will change dramatically depending on your workload and size of messages. So always try it out before you blindly repeat these numbers.
Summary
I hope you enjoyed this blog post, and I hope you can see how easy it is to get RabbitMQ running and using it from .NET. We didn’t explore the more advanced exchange types, but I hope that this is enough to get you started experimenting with RabbitMQ. If you find it useful, let me know, I’d love to hear what interesting uses you come up with!
Loved the article? Hated it? Didn’t even read it?
We’d love to hear from you.

Thanks for the post, it’s going to save me a bit of time 🙂
Just a quick question regarding the acknowledgement of a message. Does the RabbitMQ API support transactions? Does it support TransactionScope?
Cheers,
Rohland
@Rohland Yes, RabbitMQ supports transactions by calling the TxSelect() method on the model class and then calling TxCommit or TxRollback. I don’t know about support for TransactionScope, but it doesn’t seem likely considering that the transactions work on a single model only, and there is no way to enlist a new model into a transaction. I’d have to do some more research to verify this though.
You’ll see that in Erlang, "performance" is a much more mature notion than in .NET 🙂
What were the byte size of the messages you were using to achieve that throughput Justin? I am trying to roughly gauge this against our current system (local SQL Express databases with a scheduled import job) to see if it warrants further investigation.
@Charles the messages were simply the test ones I used for the post. How big are the messages you are using? I can run the test again with a message size closer to what you have.
Based on the sum of length for the data types we are recording and the average number of rows created now for a single "message", looks like 1,493 bytes per message.
@Charles Cool, I’ll run the test again tonight with 1500 byte messages and let you know the results.
@Charles It looks like with about 1600 byte messages, I am seeing about 14,000 messages per second write, and 16,000 messages per second on reads. Hope that helps!
@Justin yes that helps. Definitely within the realm of usability for us. We were exploring options to use SQL Server Message Broker (sadly bought one of those $50 books for it too) but without serious additional hardware it wouldn’t be able to keep up with the message traffic – and mostly the message traffic was the XML wrapper! (Even in a binary protocol mode it still had too much overhead.)
A simpler message queue is really what we need and this approach would allow us to move away from fixed machines (we have 4 physical now, would like to spin up more images during heavy load and reduce during light – but the fact that we have local SQL Express databases as a performance stop gap solution is preventing this transition).
If you would like even more speed you should take a look at Beanstalk, http://kr.github.com/beanstalkd/. Less features than Rabbit though..
Great post. Thank you! Enjoying the power of RabbitMQ + .NET!
Looks interesting … Thank you
Nice and running on ec2 no issues?
@Dean Yep, on EC2 with no issues.
Thanks for the post. Its indeed helpful.
Can u show some light on how to add listener to the queue so whenever a message arrives at queue, my custom service will be notified?
Thanks again.
@KK That part at the end of the post, with the subscription, that is exactly what that code does. It listens on a queue for messages to arrive, then processes them as they come in.
Hi Justin,
thanks. I understand the subscription part of it. i was just checking for any other mechanism so as to be notified rather than doing the listening job in an infinite loop.
thanks again for the clarification. and one more thing i want is to know how can we attach a call back to a queue message in the client?
thanks again
@KK Well you really aren’t. The call to "Next" is blocking, so you don’t get caught up in a tight loop. So, the loop is to allow the message to process, but once you go back to the "Next" call, the thread stops there until a message arrives… unless you specify a timeout. I believe you can also consume the subscription in an iterator.
Thanks Justin!
This clarifies and i have no further concerns on the listener.
one more help is to add a callback for each of the message that my application adds to the queue. so that i could see what is the result of the processed message.
thanks again, KK
Although subscription.Next() is a blocking operation. You can use EventingBasicConsumer if your want old style async events instead.
@KK That isn’t straightforward. You’re dealing with an asynchronous system, so you’ll either have to update some shared resource (like a database) or you’ll have to have a correlation id and place a result message back on another queue which can be tied to the original message.
Anybody played with RabbitMQ clusters? I am wondering how to load balance / High Availability using Rabbit
Thanks for this great post!