This article is dedicated to designers everywhere.
Setting the Scene
Have you ever entered a design file, possibly one you have started and finalized, only to reenter a few weeks later and feel lost? Or questioned the placement or context of a particular section of your design? Maybe you’ve been handed a design file that needed additional updates or redesigns and there’s no clear documentation to help guide you through the mockups.
You may be thinking, go read the original strategy, discovery or requirements documentation. While this can help a designer refresh their memory for certain concepts and findings, it doesn’t always show specific decisions or choices made in the final design. There may also be little to no documentation for a feature depending on the project.
We make countless decisions everyday while designing a complex feature. It is important to understand why these decisions are made, but also whether they are important, or just incidental. We also have outside voices, like team members and clients that can change a design direction. These decisions are not always obvious to document in the moment, but can become important later on, especially when it can impact other parts of the application or additional updates to the feature are needed.
To help with this, I’d like to introduce my new best friend: Solution documentation.
This may be something you and your team are already practicing, but I will list out our approach and what we’ve learned so far.
One thing to note before I get started, solution documentation does not replace any other documentation practices design teams should be doing. This should be looked at as additional documentation and a healthy practice that will not only help you, but your team.
Design File Maintenance
The evolution of a design file is constant and we as designers are always left with the difficult decision of how to spend our time. Whether it is maintaining our evolving design system, designing the mockups for features, writing strategy and solution documentation or scheduling and organizing user testing and design reviews to name a few. Unorganized and unkept files can cause a lot of inefficiency across a design team and result in frustration and time away from solving other problems. This can happen so quickly and easily as we work to meet deadlines and tackle more projects.
Just as code can become outdated and need upkeep (which you can read more about here), so can design files and the designs themselves. With new features like Version History or Comments within Figma, we can see progression, certain callouts, and who did what within a file, but it doesn’t always tell us the why or final decision made.
Without insight into design decisions, there will always be assumptions and guesswork the team will have to do later on.
Our Approach
Every company and team will approach Figma file management differently, but the solution documentation practices we’ve introduced can easily be adjusted to fit most teams’ structure.
That being said, if you’re going to introduce this practice into your workflow, your project files should have some organization.
Figma File/Page Structure
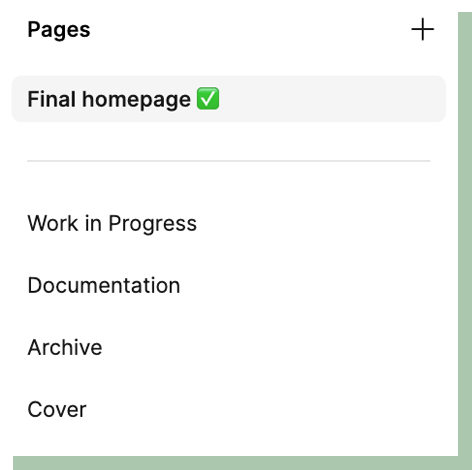
Our page structure within figma usually looks something like this:

*Final Pages: We like to create separate pages by feature or flow and show a green checkmark to call-out the completed status
**Work in Progress: Where all iterations and brainstorming takes place
To avoid tedious work of cleaning up every page within a file or every component and mock-up, solution documentation should live with the final designs. This allows designers to do what they do best, which is iterate quickly and design without the roadblock of breaking down each iteration. Adding some overview or breakdown for sections of your work in progress is never a bad idea, but it should be a generalization.
Screen Documentation
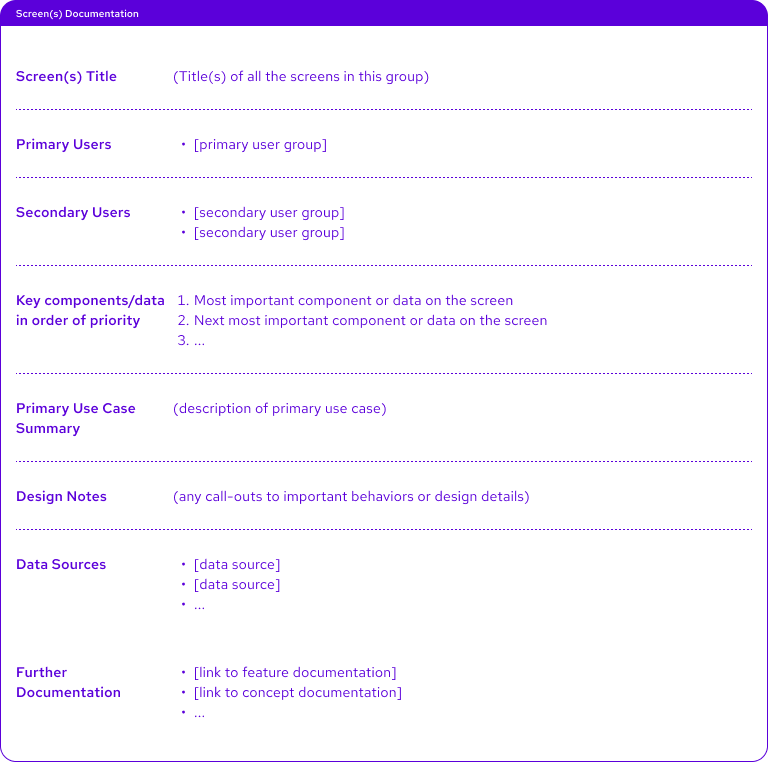
 This effort has improved with the help of Spencer Hansen who can make chaos feel like a stroll in the park. Based on our needs, he created a card component, specifically for screen documentation to be filled out for each final design page.
Card structure and content:
- Screen(s) title/header
- Primary Users
- Secondary Users
- Key components/data in order of priority
- Primary use case summary
- Design notes
- Data sources
- Further documentation
Some of these sections may not get filled out, but as the lead designer you should be able to quickly go through each section and add key information into most. As you go through reviews and make last minute tweaks, adjust or add to this as necessary. Within seconds, any viewer of the page should have a very good understanding of the mockups/screens they’re about to look at and resources they need in support.
This card is meant to be the starting point for any visitor of the file and help guide them through the solution.
Solution Documentation
 Now, I would like to introduce you to my best friend. The following is a loose guideline, with some tips and tricks I’ve learned along the way.
Structure
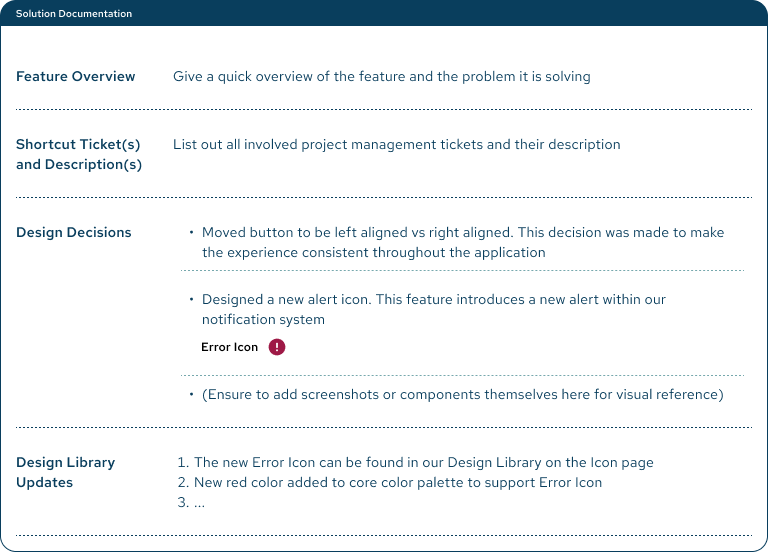
I keep everything in one section titled ‘Solution documentation’ that lives next to the screen doc card. You can split up sections as you see fit, but I find one helps keep everything organized and contained.
- Jira/shortcut tickets + Description + Link to ticket
- Design decisions
I start from the top of the mockup and move down to breakdown the main sections of the screen.- Layout
- Has anything moved
- Specific ordering for fields
- Navigation changes
- Design system
- Are there new components that need to be added or were added
- New variants to a component
- Feature specific components and content
- Data shown – is this placeholder text or does it match what production should be
- Ordering of data
- Is this section anywhere else in the application or only used here
- If there is a variation to anything, why?
- Layout
Tips and Tricks
Topics covered
- Timing and dates
- Quantity vs quality
- Approach and documentation needs
- Design library considerations
- Stakeholder and team input
- Communication
- First and foremost, timing is very important. The longer you wait, the more difficult it will be to remember your decisions, defeating the purpose for this practice.
- How much documentation is needed? It’s a delicate balance. This is not meant to take too much time. If you don’t know who the secondary users are or there isn’t further documentation, move on. If all components in the mockup already exist in the design system, you’re good to go.
- When I approach my solution documentation, my first thought is “What change did I make and why.” If it’s from a new requirement and very specific to the mockup, I’d rather write it down so I can get up to speed quickly if I ever need to go back to the design in the future.
- My second thought is, “If I wasn’t the primary designer on this project, what would I need to know that isn’t obvious to any other member of the team?”
- Links and other resources
- It can get tedious if links get out of date or you’re unsure if certain information is important to stay in the file. Make a callout. We like to use “deprecated”, but “archived” or “old” works just as well.
- This lets the team know there is a new source of truth and not to use outdated information or mockups
- The other links or documentation should be left for archival purposes if it is useful to the history and decision making of the feature. Use your best judgement on what information should stay and what can be deleted
- If not all documentation can reside in Figma due to project constraints like security concerns, it’s important to understand where it lives and what data should not be included within figma
- Design Library callouts
- Any detached components?
- New components added to the design system that originated in the design file
- New components needed to be added to the library
- Add screenshots to support your breakdown
- Data shown in a design file could be placeholder text, but sometimes it can be very specific to the feature itself. This needs to be highlighted and point to any further documentation.
- Some comments from the team lead to a decision that was made in the design. If it’s buried or dictates a variation from other sections of your app, this should be highlighted to avoid team members or yourself digging through comments to remember the final decision and why.
- And to follow that last bullet point, clean up your comments in the file. We find that lingering comments can make the designs appear unresolved and these should be resolved or documented if they cannot be changed in the solution documentation.
- Dates. Some decisions are made and will require you to go back to the design or another team member. This will help everyone understand how old the design file is and what was last updated. In case you need to leave the design to work on something else and come back later, it will point you in the right direction.
- *Version control can support this, but leaving a note from the original author can make that information visible to everyone more easily
- Did something not get done? Is this design a minimum viable product (MVP), but will be the final for the foreseeable future? What was left out of the MVP and where can the next designer or yourself look to pick it back up.
- Do not hesitate deleting or adding to this list. I am sure there comes a point of over documenting, but in my experience there typically isn’t enough.
Happy Solutioning
There you have it. My new best friend and maybe yours. For anyone reading this, I hope you can find some value in our new approach and can add something beneficial to your workflow and team. I have found a lot of enjoyment in this exercise, building the outline and map to my (and the teams) designs and decisions. To view your progression in a solution is very rewarding and it’s even more rewarding months later when you can communicate those intricate details to stakeholders and team members. What’s even better is that this practice is flexible and will grow with you as a designer and contributing team member.
With that, happy solutioning. Your future self will thank you.
Loved the article? Hated it? Didn’t even read it?
We’d love to hear from you.

